| Installation: |
|
| Turn your scopes elevation turret to approximately
midway between its total up and down capability. Remove the set screws
all the way from the factory elevation turret. Carefully pull upward on
the factory turret while turning counter clockwise. Turret should come
off smoothly. If not, do not force, consult the factory. Make sure there
is a small amount of white grease on the rubber o ring on the exposed
turret tower, if not, carefully apply without getting any grease in the
turret tower. |
|
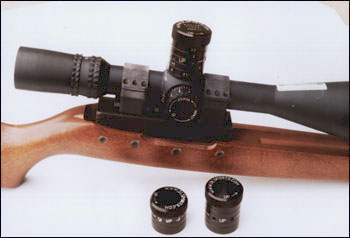
| You will note that the D&L turret has six set
screws. This heavy duty design is to minimize the chances of turret slip
under field conditions. Weaker designs, which can easily fail under field
conditions and allow turret to slip, can be disastrous due to a misdialed
turret. |
|
|
|
| Remove all six set screws from the new turret.
Position the turret over the turret tower and lower the turret onto the
tower with a gentle pressure and clock-wise turning of the turret. Once
down, the turret should spin freely. Look inside the threaded turret holes
with a flashlight to be sure the turret holes line up with the groove
in the scope adjuster. Once properly aligned, install opposing set screws
and lightly tighten. Then install the remainder of the screws and lightly
tighten. Tighten the screws progressively tighter from opposing sides
until they are all tight. Now turn the turret. You should feel the clicking
of the scopes adjustment. |
|
|
|
| Once the scope is properly mounted and squared,
and the turret is installed, precisely zero the rifle at 100 yards with
your carry ammo under your particular environmental conditions. With a
Sharpe pen, mark a 100 yard zero line on the turret where it aligns with
the turret tower line. Now turn the turret down until it stops while counting
the clicks. Make note of this number. This way you will be able to bottom
the turret out if you get confused in the field about what revolution
you are on, then count this number of clicks back up to your 100 zero
and confirm. Always be sure of your zero before taking a shot (zero can
be roughly confirmed with a Collimator in the field without firing). It
is also recommended to turn past your zero point at least two clicks and
come back to your zero point to assure all blackash is out of the adjuster. |
|
| If you are using a slanted scope base, you may
find the NXS turret is very close to bottomed out at your 100 yard zero
point. This is good, as it makes it very field expedient to bottom the
turret out and return to your 100 yard zero. However, if the outer skirt
of the turret bottoms out against the scope body before you obtain a 100
yard zero, there is a method for lowering the turret farther. Remove the
turret and turn off a few thousandths of an inch of material from the
bottom of the turret's outer skirt. Optimal field practical turret setting
would allow the turret to turn past your 100 yard zero point about 1/4
turn. This will allow quick return to your 100 yard zero after bottoming
out as a reference point. The amount of turret travel will of course depend
on the scopes mounting position, trajectory of the cartridge, etc. |
|
|
|
|
| Once a 100 yard zero is established and the turret
marked in the lowest blank scribed ring area, move 150 yards and establish
your next zero and make your next temporary Sharpe pen mark on the turret.
Proceed to longer distances in 50 yard increments (25 yard increments
recommended for sub sonic ammo) until you have reached the realistic maximum
range for your shooting system. As you complete full revolution with your
turret, begin making marks in the 2nd blank scribed area on the turret.
After that revolution, make your marks in the 3rd blank scribed area,
and so on. The NXS long range and Leupold turrets will allow for four
complete revolutions of distance markings. The NXS medium range turret
will allow for two revolutions of data. |
|
|
|
| Once your temporary distance markings are precisely
written on the turret, you should remove the turret and permanently inscribe
the markings. Recommended markings for 100-1000 yard are simply the numbers
1-10, with 15,25,35,45, etc., between the main numbers to indicate 50
yard intervals.The turret can also be engraved with your cartridge load
information. Multiple turrets can be completed for different temperature
ranges, altitudes, and environmental conditions.Once completed, the turret
screws can be loctited with #242 lock tite and progressively and evenly
tightened again. (Caution) Only a dab of loctite on the outer threads.
Do not get loctite inside the center of the turret or on the inside turret
tower. |
|
|
|
| Once this procedure is properly completed you
will have effectively eliminated click counting M.O.A. elevation calculations.
Simply dial up the desired zero after determining the correct distance
to the target. |
|
| This product is designed to work well with other
professional grade products from D&L Sports™, such as the MR-30PG precision
rifle, the D&L custom reticle, and field practical training at the D&L
Small Arms Training Academy. FMI see www.dlsports.com |
|
| Thank you and good shooting, |
Dave
Lauck |
|
|
)
)
)
)
)